Project Works
A works can be split into one or more sections.
Works Summary

“Project Works Length”, “Project Average”, and “Project Works Area” are only populated by sections where the Intervention Type is not set to None.
Project Notes
Free text box for users to save custom notes for a project.
Works Grid
Functionality
“Expand All” - expands all sections, and all lanes within each section.
“Collapse All” - collapses all sections, and all lanes within each section.
“Full Screen Mode” - to open, click the double-header arrow at the top of the grid panel.
View Options
Default columns:
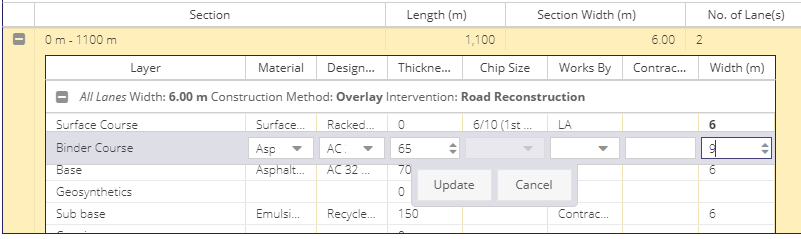
“Layer” - the name of the pavement layer. This is not editable.
“Material” - the material type used for the layer. To remove a material either delete it using the keyboard, or right-click on the record and select “Clear Material”.
“Designation” - the material designation - the options in this list are dependent on the selected material for the record.
“Thickness (mm)” - the thickness of the layer in millimetres.
“Chip Size” - some material designations use a chip size for the thickness rather than a value in mm. Only one of thickness or chip size will ever be set for a particular designation. For calculating volumes all chip sizes are considered to have a thickness of 0 mm.
“Works By” - this can be set to LA or Contractor
“Contractor” - the name of the contractor used for the layer (if any)
“Width” - See Layer Widths below
“Show Material Costs” - this displays columns in the grid related to unit costs. The m2 and m3 unit costs are mutually exclusive - setting one sets the other to 0.
“Unit Cost (€/m2)” - this unit cost is used based on the area of the layer
“Unit Cost (€/m3)” - this unit cost is used based on the volume of the layer (area * thickness)
“Cost (€)” - this is the unit multiplied by either area or volume.
“Show Section Dimensions” - shows fields related to the dimensions of the section in the lanes records.
“Length (m)” - this is the length of the section, displayed for each individual layer record
“Width (m)” - this is the area of the section (rather than the width of an individual layer)
“Show Active Records Only” - this hides any layer which does not have a material set
“Show Treatment Course” - adds a Treatment Course row above Surface Course
“Show Regulating Layer” - add a Regulating layer row below Surface Course
“Show Layer Description” - show the layer and description columns only.
Sections
To add a new section click the “Add Section” button
To delete a section right-click on the section record and select “Delete Section”
To edit a section right-click on the section record and select “Edit Section”
To highlight a section on the map highlight the section record
When working with the line tool, once a user has created a geometry and is adding sections for this geometry, Automated Chainage Calculations come into play.
Adding a Section
Set the start and end chainage for the section. The minimum start chainage is 0, and the maximum end chainage has to be less than or equal to the project length. Sections cannot overlap with any existing sections in the project.
Set the “Total Number of Lanes” - this is the total number of lanes on which works will be carried out (rather than the total number of lanes within the section).
Next choose if the works section will have the same construction carried out for “All Lanes” or if each lane involved with the works will be defined separately.
Next we can define properties for either “All Lanes” or for individual lanes.
Lane - this is the name of the lane and is read-only. Lane 1 starts from the left of the road in the direction of the works.
Construction Method - the construction method used for the lane.
Width - the width of the lane within the section. This will become the default width for each Section Layer.
Valid - indicates if all required fields for the lane have been set correctly
Once the section has been added it will appear as a record in the main grid of the Works tab on the Project form.
Edit a Section
The user can Edit previously added sections by calling the Add/Edit Section by either double clikcing on a section entry or right-click on a section and selecting Edit Section from the displayed context Menu.
Copy a Section
It is Possible to copy a section by right-click on a section and selecting Copy Section from the displayed context Menu.
Note: The copied section will have a chainange of 0m-0m (which the user has to Edit), but all details related section layers will be copied as per the original section
Delete Section
Sections can be deleted from the works grid by right-clikcing on the section and selecting Delete Section from the displayed context Menu.
Lanes and Layers